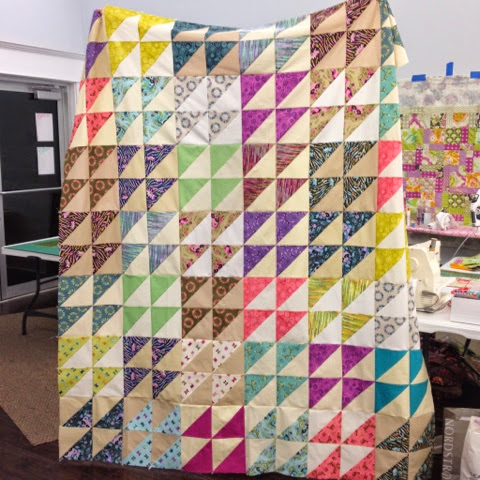
Wednesday, May 22, 2013

Send some love to Moore, OK


Send quilts, money, virtual hugs and/or prayers. Every little bit counts!

Tuesday, May 7, 2013

give me liberty! sew-along reveal + link up + giveaway

Boy, this day really got away from me! In all fairness, I spent most of it in bed until now, as I'm home sick with the not cool kind of tummy ache. Not that there's ever a cool kind. But this kind is the really not cool kind. Now to get that thought out of your mind, here's my Give Me Liberty! sew-along project, lounging about amongst the violets.

It was originally going to be a big pillow, but I switched gears and made a little mini quilt instead. I plan on hanging it either in my sewing room or the living room if I can find the right spot for it! Though it looks pretty cute under my great grandmother's kitty tea pot and sugar bowl there on the sideboard. That's the antique piece of furniture Jon's family got us as a wedding gift, which I'll have to properly show off sometime soon!


I used two layers of batting so it would be puffy and quilted a diagonal crosshatch through the half square triangles. The backing is Millie's Closet "floral bouquet" in green, (another FQS 50% off bargain buy) and I bound it with a brown civil war print that I absolutely adore and would buy a lot more of if I ever saw it again. I'd like to put a little label on it, when I get a chance.

The Give Me Liberty! sew-along link up is over Nicole's blog, Bold Goods, today. She's posted a lovely baby quilt and interesting thoughts on it's design and construction. Go check it out, will ya?  We had a lot of fun hosting this thing and can't wait to see your projects! Don't worry, they don't have to be finished, and I think she's leaving it open for a whole week in case you're not ready just yet.

And since there are a bunch of half square triangles left over, I thought I'd offer them up in a little giveaway of sorts. If you've recently sewn up anything using Liberty prints and would like to post about it and our link-up, anyone who links up will have chance at nabbing my remaining 40+ 2.5" trimmed, Bloomsbury HST units. Keep in mind they're tiny and have bias edges, but man their cute. I'm secretly hoping no one enters so I won't have to part with them!

I'm also linking up with Quilt Story's Fabric Tuesday :D

Monday, May 6, 2013

scrap pile 64 patch - a tutorial

These blocks are what I'd like my fellow STS! bee mates to whip up for me this month, as it's my turn to be queen bee. They're a variation on Steffani's St. Louis sixteen patch, basically just shrunken down and quadrupled.
scrap pile 64 patches
This block finishes at 12" (12.5" unfinished) and uses small strips which I managed to find in my scrap pile. Hence the name, since I wasn't sure what else to call it. Does it have a real name? Let me know if you're aware of one. I thought I'd share how to make them.
pick four sets of contrasting prints
You need 16 strips, each measuring 2"x8.5" for this block, in contrasting values for the pattern to really pop. I used four different low volume prints and four different high value prints that "read" a specific color. Essentially we're constructing four 16 patches and then piecing those units into a 4 patch.   
sew four strip sets
Sew your strips into four sets, as shown above. You'll want to use a scant 1/4" seam since there are a lot of seams in this block and a few threads difference really adds up. Make sure and set your seams as well, for the same reason. I also happen to find setting my seams makes pressing them easier and faster
set the seams
For the strip sets, press seams to the dark side. This will make things easier down the road, as your seams will "lock" and allow for perfect points without the use of pins. I didn't use a single pin while piecing these blocks, which makes me quite a happy camper.
press to the dark side
Now take your strip sets to the cutting mat and stack them up on top of each other, using the seams to help nestle them together perfectly. You could always do one at a time, but when doing a whole bunch of these I can go much faster going two or four at a time.
square it up

There's an extra 1/2" of wiggle room built in, so go ahead and square up the one side before you proceed. I like to line up my ruler with the top and bottom edges first, then check to see if the center seam lines up squarely, too. If my piecing and pressing were accurate, and the seams nestled nicely when I stacked the sets, it usually turns out pretty square. If not, I fudge a little and make it work!

subcut, rotate, pair right sides facing
Subcut every 2" and then rotate every other strip and pair them right sides together. I chain piece all the pairs before pairing those pairs...This next part is important! Sew all your pairs together the same way, as in feed them into the machine with the light square on top every. single. time. If you mix up and do it both ways, you'll end up with two sections that won't go together right. 
feed with light fabric starting on top
I did all of mine this way just to be consistent, this will make seams lock the right way later. That little metal thing to the right of my presser foot is a 1/4" guide. It's magnetic and sticks strongly to the needle plate. I bought it a long time ago and only just started using it with all the strip piecing I've been doing lately. I think it helps.
press seams all to one side
Remember to set your seams again, and this time press them all to one side. After that, pair up both sets of 16 patches and rotate until the seams lock when right sides are facing. Sew them together and press that center seam the same direction as the other seams of that unit. Almost done! Sew the one remaining seam and press it whatever direction you want.

Hopefully after all those seams your block comes out at 12.5" or just a smidge under. Mine are a hair smaller, but I figure if all my blocks come back somewhere between 12.25" and 12.5" I should be able to force them all together just fine. Don't worry about slightly wonky edges, I wouldn't bother squaring up your blocks unless they're really heinously uneven. 

Even though these were pretty random pulls from my scrap pile, I think the color palette turned out pretty neat. Like a cheeseburger near the beach or something. Or am I crazy? 

Anyways, hope that didn't bore you! Let me know in the comments if something is totally wrong or ridiculous, I've never posted a real tutorial here before... it's my first time so go easy on me!!

Saturday, May 4, 2013

bee blocks + st louis 16 patch

I figure I ought to share my April STS! bee blocks since it's May already. They are for Deb of Life on the Selvage Edge and were a lot of fun to make. She asked for a scrappy, low volume background with a pop of color for the cross. 
low volume charm plus blocks


This month it's my turn to be queen bee. I decided on my block yesterday, sewed up a couple and will be revealing them along with a tutorial of sorts as soon as possible. Probably tomorrow. They're a variation on a project I started recently, which I'll now tell you about!

I've wanted to make a strip-pieced 16 patch quilt for months now, I'd even thought about making one with my Liberty stash for the Give Me Liberty sew-along, but once Steffani's St. Louis sixteen patch hit Instagram, I was all over it. Think scrappy trip along with bigger strips and no seam rippers! 
charleston farmhouse by felicity miller


Two weeks ago I got this Charleston Farmhouse fat quarter bundle in the mail from Pink Castle Fabrics. It was an impulse buy! I'd never seen or heard of this line before, there was a bundle sale going on, I loved the colors and bought it from my iphone without really knowing what it looked like up close! I immediately pulled ten coordinating prints from my stash to give me a total of 30 fat quarters, which will yield 30 blocks for a 5x6 layout. 
with ten stash pulls mixed in


A few nights later I spent roughly 2.5 hours working on it. First I sorted my fabrics into four values: darks, medium darks, medium lights, and lights. I then used a black and white photo to check to see if there were any outliers and adjusted accordingly. A couple of these prints were hard to do considering the print, but I made sure to pair them with something that had color contrast as well just to be safe.
sorted into four values


Then I paired the darks with medium lights and the lights with medium darks in order to get the most contrast in each of my blocks. Again, I double checked with the black and white photo.
contrasting pairs (i swapped middle row, far left with bottom row, second from left after this photo was taken!)
All that might have taken a half hour, maybe less. The real time suck was pressing and cutting! It's one of my favorite parts, though. I did it in a very methodical way, pressing each pairing right sides together so they'd be pressed together and ready to sew after cutting. I use Magic Sizing to stiffen my fabric up, I find it makes the whole process of piecing a quilt a lot easier than using nothing at all.
sub-cutting 4.25" strips


I even upped my strips to 4.25" by 17" in order to get the most out of my fabric and increase the size of the unfinished blocks from 14.5" to 15.5".  The tutorial calls for 4" by 16" strips but you can comfortably squeeze in an extra 1/4" and I even saw someone on IG doing 4.5" by 18" but that leaves you no wiggle room if your fat quarters aren't the right size or perfectly square, or if you just wanna be able to work fast and trim down later. 
a strip-piecing pile-up


At any rate, 2.5 hours of mad crazy strip piecing on the following Friday morning yielded 16 blocks. I finished the remaining 14 a day or two later, which would yield a 75" by 90" quilt. I spent a day or two deliberating how I could manage to make 6 more blocks so it can be big enough for our bed. 
the first 16 blocks, not the final layout


I called numerous local quilt shops (anything within 2 hours driving distance) to see if they had some Charleston Farmhouse so I could get it immediately but had no luck. I tried my stash too, but I'd already pulled as much as I had that would work with this. I ended up ordering more fabric online and if it comes in the next week or so, we might just have a wedding quilt after all! 
Also, don't forget about the Give Me Liberty! sew-along, we'll be linking up our projects over at Bold Goods on Tuesday, May 7th. Can't wait to see you there :D

Tuesday, April 23, 2013

give me liberty!

Hi there!!! Exclamation points!!! 

I meant to post about my Give Me Liberty sew-along progress on Monday, but life got in the way. Stupid life. I have 81 2.5" half square triangle units hanging out and waiting to become a pillow. I've been playing around with options but am not sure where I'm really headed yet. 


Nicole has made some really inspiring blocks which you can see here. I really love her style. How far are you? Have you shared your progress? I'd love for you to leave a link in the comments so I can come check it out, as well as anyone else who's interested! 

Sunday, April 21, 2013

recent acquisitions - sunday stash

I've been in fabric acquisition mode lately. I blame Instagram and Paypal, primarily. People are like "buy this awesome fabric!" and I'm all like "ok, I will!" Paypal makes it so easy. Since I'm trying to get back into the blogging groove, I thought I'd share what's come in the mail recently.


I fell in love with Michael Miller's mirror ball dots at Quiltcon but didn't buy any. Then Jennifer posted this bundle for a bit of a deal on IG and I took the plunge cause she's a pal and I like supporting quilty friends. You can find this same bundle in her etsy shop.


I hate that the photo is blurry, but you get the idea. I nabbed these cuties in an IG destash. User @msjonah has an etsy shop which you can find here, and she's got one heck of a stash. It's more like a decent sized fabric store, since she seems to purchase a lot of things by the bolt. She's heading to quilt market in Portland and needed to make some room for new stuff.


She even offered up small scraps for free, so long as I paid the shipping. Score! These are all japanese import and/or kawaii fabrics, I'm not sure what that means but I know they're awesome. She sent my mushroom, hedgehog, and sheep fat quarters in a medium flat rate box, packed tightly the rest of the way with these awesome scraps. I love itty bitty patchwork so these will be perfect for that.


I also hit the $6 voile bandwagon pretty hard over the last several weeks, ordering a few different times from Sew Mama Sew before she suddenly decided to close up shop. What a bummer! I plan on doing some kind of fast, strip pieced quilt from the voile, with that top AMH "clippings" print for the backing. I figure the "pastry" stripes will make decent binding. I also bought enough of the bottom two prints to make myself a couple summer dresses.

Well, that's all for now!

Edit to add: sometimes I write fast and forget to spell check... in the original version of this post (and post title, ack!) I misspelled the word "acquisition" in a really obvious, goofy way. Whoops! Talk about embarrassing. I'm sure my English teacher sister was horrified :P

Also linking up for Sunday Stash with Kate at KateQuilts

Friday, April 19, 2013

comma mini charm zip pouch

The Moda booth at Quiltcon was handing out free mini charm packs, comprised of 2.5" squares. I picked the Comma line by Zen Chic and immediately sewed it up into a simple patchwork panel when I got home. I pieced them using the fusible interfacing method, mostly because I planned to make a zip pouch from it and figured the stiffer it was, the better.


I added some batting and quilted it using a zig-zag stitch along all the seams, then decided it wasn't quite stiff enough for my liking and went back over it with a grid on the diagonal through the points. All this was done with my walking foot. I used some mechanical genius circuit boards (a Timeless Treasures print I got for 50% off at Fat Quarter Shop a while ago, gotta love a good deal!) for the backside and quilted it with wavy lines in orange thread. 

The lining fabric is a Tina Givens print called "on the fence" which I picked up a few months ago in a super sale at delta patchwork for something like 2 dollars a yard. Talk about cheap! The scale of the print turned out way larger than I was expecting, so I figured I'd use some of it up for this. 

I put little tabs on the ends of the zipper and kept the zipper+tabs length a good 1.25" shorter than the width of the outer panels so the tabs wouldn't get sewn into the seams. This way it's less bulk to sew through and the corners look neater, I think. I also kept the lining a good half inch shorter on the sides and bottom, making it a tad smaller so it would fit better inside the pouch. 

I'm very please with how it turned out, even though it took me a month and a half to finally install the zipper and finish the darn thing! It measures in at a generous 12x14 inches and will be perfect for carrying my rotating cutting mat, square rulers and other larger, flattish quilting tools when I'm traveling. And kudos to me for whipping up a post about it the same day I finished it!


There are still two hours left in this Friday, so I'm linking up with Amanda Jean over at Crazy Mom Quilts for Finish it up Friday :D

Oh and don't forget about the Give Me Liberty! sew-along Nicole and I are hosting! I plan to post about my progress on Monday and would love for you to come by then and share where you're at in the comments. Have a fantastic weekend!
Related Posts Plugin for WordPress, Blogger...