It probably sounds crazy to make an entire quilt using 1.5" squares. And not the method where you sew long strips together then slice and rearrange. The method where you use English paper piecing and sew each and every one of those little guys together by hand.
Crazy is exactly what that is! So while several of my Instagram (IG) peeps who are inch by inch quilting along with me are doing it that way, and I greatly admire they're patience, I've got enough EPP projects going and decided to take a different approach. Working with a huge variety of small scraps eliminated the option for strip piecing, so I went with the fusible method.
I kind of just figured it out myself but after having people on IG ask about it, I googled and found this great
tutorial by Elizabeth Hartman. I had drawn a 3" grid on my interfacing to help me align my 1.5" squares, but she suggested drawing the grid once and reusing it, which I might implement next time.
I used pretty lightweight interfacing, I'm not sure what kind. Something I bought a lot of a while back when it was 50% off at Joann's. I've heard people voice concerns over the bulkiness created when doing patchwork this way, but in my experience a few washings really softens it up just fine. I might end up turning these patchwork panels into giant couch pillows, so a little extra stiffness wouldn't be so bad.
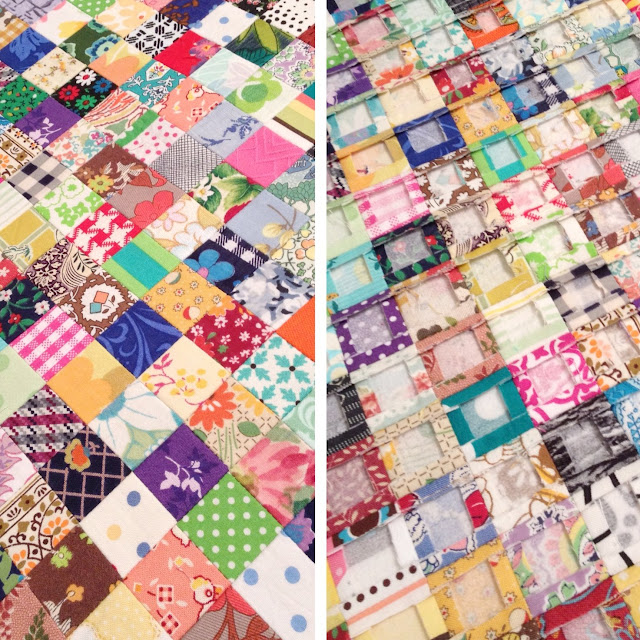
The folding and sewing bit worked slick, I had a lot of fun with this part. This panel here is actually the third one I've made, the first two were much smaller on scrap pieces of interfacing, so this time I went big. On the second one I sped through it to see how quickly I could get from point A to B, but was a bit disappointed by how poorly my seams met up afterwards. So this time I took a little more care to make sure everything was lining up nicely and sewed a little slower, totally worth it!
When it came to cutting open the seam allowances, I first tried scissors but mine were too big and it wasn't working for me. So I tried my seam ripper, which worked wonderfully, gliding along effortlessly. But for the second set of seams it kept getting hung up on the first set of seams, so I just used my rotary cutter and sliced off the edges.
Ironing the seams open on this project seemed like the best way to go, since "nesting" didn't come into play and with the bulkiness from the interfacing I thought it would lay flatter. The dark/light side thing wasn't an issue either, since these colors and values were all over the board and the interfacing helped eliminate transparencies in the fabric. Normally I find it irritating and finicky to iron seams open, but the stiffness from the interfacing made these spread apart quite easily for me.
This whole quilting with teeny squares thing is a neat idea, but obviously not a new one. A couple Instagram peeps started doing it four months ago, I suggested we
use the hashtag #inchbyinchquilt (my one and only major contribution to
the whole thing) and soon it turned into an international scrap swap
involving 10 people officially and several others unofficially. Recently
a new round of swapping has started, which I'm not participating in
because I still have a ton of scraps to cut from the first round and
I'm not sure I'll ever end up using them all.
Here are images shared on IG in the
#inchbyinchquilt photo pool. Pretty cool stuff, right?! It's fun seeing everyone else make progress, motivating and inspirational too! I'll keep adding my shots as I make headway and it will be neat to watch the new crop of IG peeps inching right along with us. Have you ever made a postage stamp quilt? I googled and found this
tutorial by Rita at Red Pepper Quilts, which looks pretty neat.
I'm headed off to see the latest Twilight movie with a couple of coworkers, which we've done together for a few years now. This is the last one though... Ah, the end of an era!


Wow Krista! Good for you. That is looking great. I always wondered how the ironing on that tutorial would go. I can't see myself ever doing that, but I think that if I went for a pillow I could manage! I look forward to seeing the finished product.
ReplyDeleteWhat a great job you have done with this! I couldn't imagine EPP such little squares and this method certainly looks 'do-able'!
ReplyDeleteI still want to try this. Yours looks great. Team Edward! :-)
ReplyDeleteWow, this is so awesome! The interfacing idea is genius. I'm sewing together 1.5" squares too. I'm doing it literally by hand though. As in hand piecing. It's taking forever! I started like 3 years ago and I have ten 25 patches done. I need like 100 more!
ReplyDeleteI love the view from the back! I saw that EH tutorial when she wrote it, the concept still kind of confuses and scares me. But maybe one day I'll do something teeny tiny, too.
ReplyDeleteYou are patient, and the tiny pieces are lovely.
ReplyDeleteLove all the happy patchwork squares! The interfacing method is my preferd method, too. I can't imagine hand piecing all those, I have enough of that with my hexies, haha. I'm benind on the Twilight movies, I have only seen the first two. I guess I need to catch up.
ReplyDeleteWowzers! I am impressed my dear. :)
ReplyDeleteThis looks superb, I've used Elizabeth's tutorial on a tiny project and it was great fun, a large one like this is awesome! Can't wait to see the finish!
ReplyDeleteWow, all those tiny little squares! Looks amazing
ReplyDeleteI've gotta try this!!! I'm intrigued and a little bit scared of the interfacing method, but I think I need to give it a shot. Thank you for your tips!
ReplyDelete